
I’ll admit, there’s a weird satisfaction in peeling off that protective film from your new kitchen countertop or seeing shiny tiles for the first time—if only the whole place wasn’t smothered in builder’s dust. People spend months dreaming up the perfect renovation, then get blindsided by the mess left behind. Builder’s clean is that “oh wow” moment between chaos and new home glory, but it’s way more intense than your usual tidy-up.
What Is a Builder’s Clean and Why Bother?
Ever tripped over a rogue nail or found sticky patches everywhere after the builders finally pack up? That right there is your primer for why builder’s cleaning isn’t just a fancy add-on—it’s the final step before your space is truly yours. A builder’s clean means clearing out every scrap, speck, and spot of grime that construction leaves behind. It goes way beyond picking up dust. We're talking about scraping off dried plaster from glass, buffing out paint splatters, and vacuuming up those tiny particles nobody sees until they crunch underfoot in your socks.
Skipping this stage can mean hours (or days) spent picking debris from odd places or plugged air vents, not to mention the hazard factor. Plus, leftover dust loves to work itself into your carpets, scratch your new floors, or clog up your filters—bad news for allergies, pets, or pricey appliances. Good after builders cleaning is a specialised deep clean. Some estimate over 60% of insurance claims for floor damage right after renovations are down to poor post-build cleanup. So, this isn’t just about making the place look good—it protects your investment, your health, and your furniture from the long afterlife of renovation dust.
The Key Tasks Involved: More Than Meets the Eye
Builders don’t just leave behind big stuff, they leave behind invisible carnage—fine dust travels everywhere, and you’ll find it in cupboards, window tracks, and even inside light fittings. So, what does a professional builder’s clean actually involve? Here’s what gets tackled:
- Carrying out an initial sweep to pick up large debris, packaging, stray screws, and nails. Those things love hiding in corners and under drop sheets.
- Dusting every surface—walls, skirting boards, doors, light switches, and radiators. Proper pros use microfibre cloths to trap dust, not just spread it around.
- Scrubbing down kitchen worktops, bathroom fixtures, and tiles. They have to deal with paint splatters, silicone blobs, adhesive residue, and fingerprints on almost everything.
- Cleaning inside and outside cabinets and drawers. You’d be surprised how much sawdust gets in there.
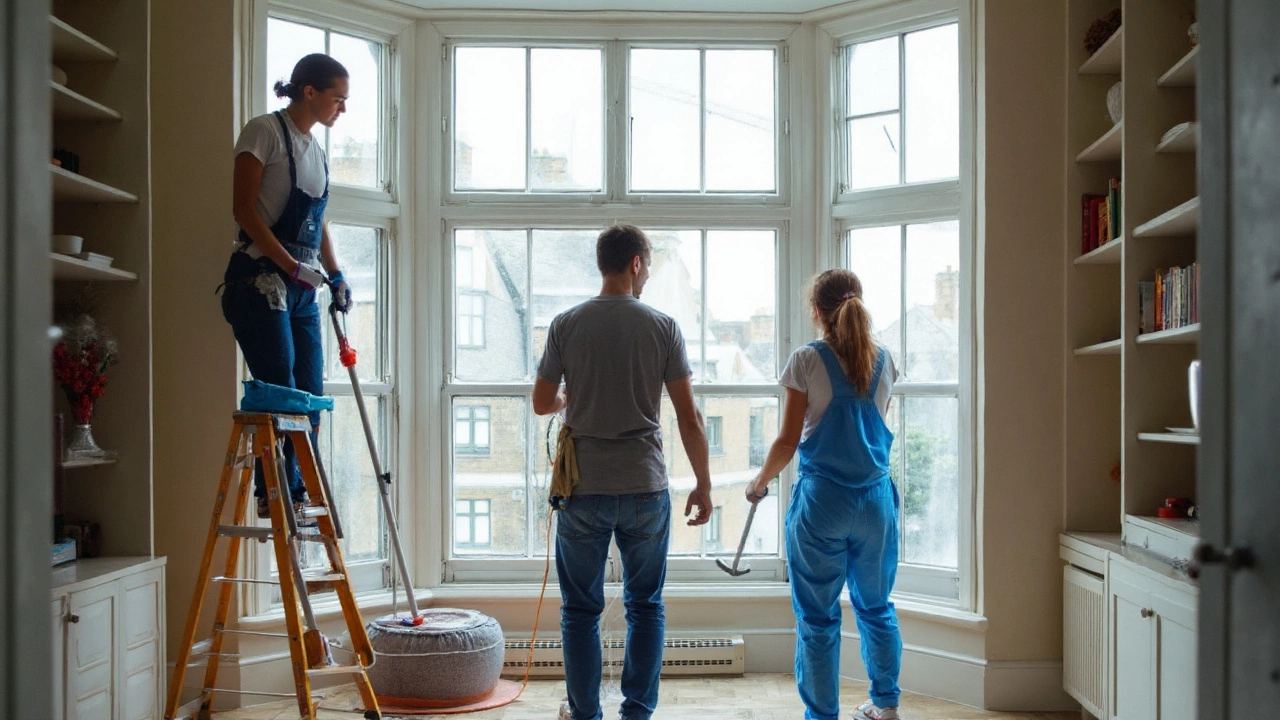
- Washing and polishing all windows and frames. This usually means scraping away paint flecks and plaster, then buffing glass until it shines.
- Vacuuming and mopping floors—twice. First to get big debris, then to catch superfine dust that settles again after the first pass.
- Clearing out vents, light fittings, and ceiling fans. Dust often travels up and builds a hidden layer where you’d least expect it.
One tip from a cleaner I met in Bristol: always check door frames and the tops of doors—these are missed 9 times out of 10 and love collecting gritty dust. And if you’ve got pets like my dog Charlie, you’ll want every corner cleared so there’s no random rattle or sharp corner for their paws.
What Should You Expect from Professional After Builders Cleaning Services?
People think a builder’s clean is just a couple of extra hours tagged onto a normal cleaning job. It’s not even close. The main difference? Detail. Every nook and appliance, every bit of joinery, and every light switch needs a close-up. Professional teams don’t just move quickly—they move methodically. First, they’ll do a site walk-through with you or the job lead, noting especially grim or sensitive spots (like special surfaces or new glass). Professional outfits will ask about recent repairs, if there’s underfloor heating, or if you’ve got delicate marble or wood that needs non-abrasive cleaners.
It's normal for a team to bring commercial-grade vacuums with HEPA filters, specialist glass scrapers, and chemical-safe solutions for sticky residues. They’ll have PPE for themselves and dust sheets for any last-minute work being done nearby. Typically, the cleaning team will start from the farthest point from the exit and work outwards, so nothing gets tracked back over cleaned areas—they call this the “last out wins” rule. Bathrooms and kitchens usually get extra passes because that's where dust and debris collect fastest. Expect them to inspect at the end, ideally with you. If anything’s been missed—like stubborn tape marks, or dust on new radiators—the best teams will handle it right away, no back-and-forth calls.
Good to know: some companies charge by the hour, others by the job. Always clarify if waste disposal is included, and ask for a detailed checklist. A solid builder’s clean can take anywhere from half a day to a few days, depending on house size, scope, and finish detail. Don’t get fooled by a vague “3-hour post build spruce”—a thorough job will take several visits if it’s a big place or if you had heavy renovation works done.
The Typical Builder’s Cleaning Checklist
If your to-do list says “clean everything”, good luck. A proper builder’s clean deserves a real checklist. Here’s what you should expect from top-tier services, and if you're DIY-ing this, use it like a scorecard:
- All rubbish, left over materials, and debris removed from the site, including packaging and protective coverings.
- Every horizontal surface wiped down, including skirtings, shelves, window sills, door tops, and ledges. Light fixtures dusted and cleaned, including lampshades and vents.
- All internal and external glass cleaned and de-splattered, including windows, mirrors, and any glass cabinetry.
- Bathroom blitz: tiles, taps, sinks, toilets, bathtubs, shower screens, and even plug holes all scrubbed and polished.
- Kitchen deep clean: appliances (even if new!), worktops, splashbacks, cupboard shelves, cooker hoods, and extractor fans.
- Floors vacuumed with a pro-cleaner, then wet-mopped with solutions suited for your flooring type—no harsh chemicals on natural stone or engineered wood.
- Checks for adhesive, grout dust, or silicone on tiles, glass, and metalwork.
- Final touch: airing the space to clear out any lingering smells. This does wonders if you had painting or varnishing done recently.
If you spot anything missed—like those hairline paint streaks on new switches or soap scum on shiny glass—speak up. The golden rule is: don’t sign off until you’re truly satisfied, because fixing issues later is always more hassle than getting it right first time.
DIY Builder’s Clean Tips and Common Pitfalls
Tempted to tackle the clean yourself to save a few quid? Totally doable, but buckle in; this isn’t your weekly tidy up. First—gear up. Use quality microfibre cloths, multiple vacuums (one for rough pickup, one with HEPA filter), a step ladder, scraper blades for glue or paint spots, and gentle, non-abrasive cleaning solutions to protect surfaces. Don’t forget gloves and maybe a mask, especially if there’s serious dust or leftover fumes.
Start high to low—knock all the dust and debris down from tops of doors, light fittings, and shelves before you vacuum. Tackle one room at a time. Bathrooms and kitchens take the nastiest hit from trades, so double down here. Floors need two rounds: once to pick up debris, again after an hour (fine dust will resettle).
- Dry dust first. Don’t get excited with a wet mop until you’ve vacuumed the powdery stuff. Wet dust turns to sticky paste and makes cleanup twice as hard.
- Be ruthless about changing vacuum bags and filters. Fine dust blocks them in minutes and you’ll just blow it around unless you swap often.
- Use a scraper and specialist glass cleaner for splatters—never steel wool or harsh pads unless you enjoy scratched windows.
- Check behind radiators, inside cupboards, and around newly installed features (especially sockets and switches).
The biggest DIY mistake? Underestimating the time it takes and leaving small bits behind. I’ve seen people give up and call the pros halfway in—not a drama, but best to know what you’re getting into. If your budget allows, it’s almost always worth hiring a team, if only for the satisfaction of walking straight into a dust-free, properly finished space.
So, whether you’re juggling a full-on extension or just fitted a new kitchen, a proper builder’s clean is the game-changer. It's the difference between that itchy, gritty new-build feeling and a true breath of fresh air when you open the front door for the first time.