
If your oven door looks like it’s seen better days, you’re not alone. I’ve been there—staring at that brownish gunk that just won’t budge. But don’t toss cash at expensive products or risk fumes that freak out your pets. Your best oven cleaner likely lives right in your kitchen cupboard.
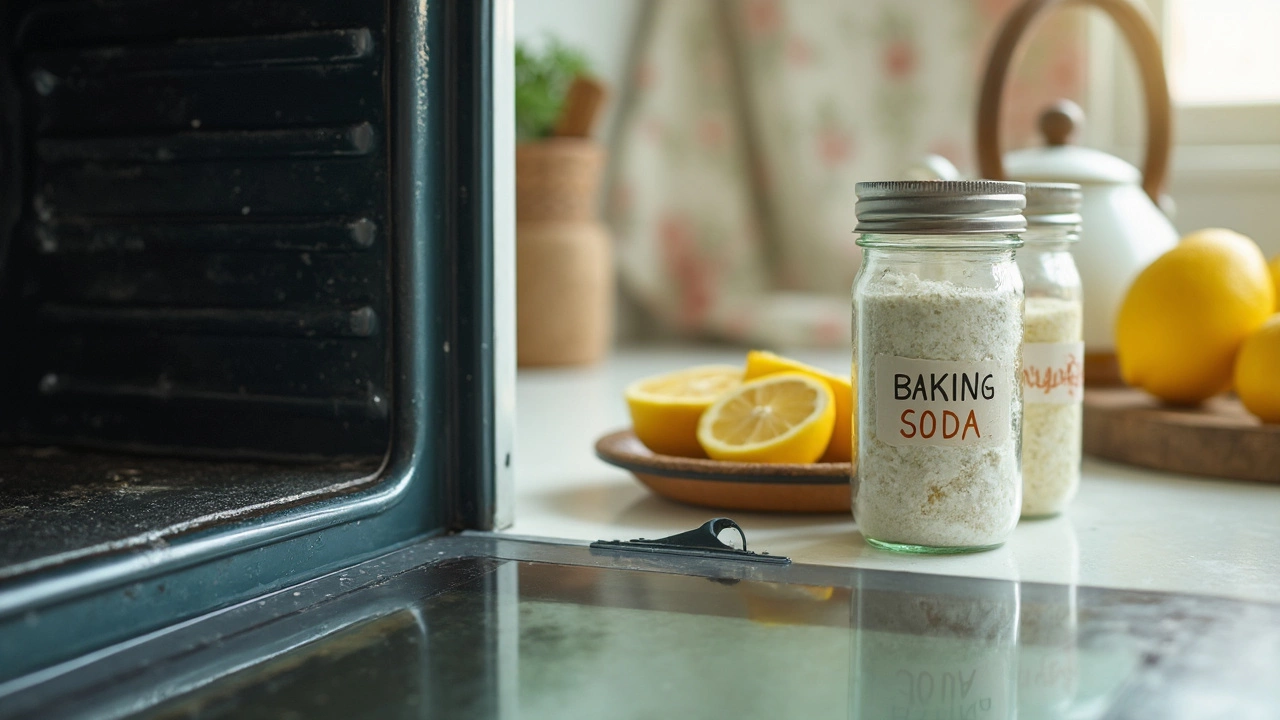
Baking soda and regular vinegar make a killer combo for getting rid of baked-on stuff. They’re safe, cheap, and don’t smell like a chemical plant exploded. Just mix half a cup of baking soda with a little water to make a paste. Spread it around (avoid the heating elements), let it sit overnight, and spritz with vinegar the next day. Crusty old spills bubble up and wipe away with surprisingly little elbow grease.
You’d be shocked how much easier oven cleaning is when you ditch the harsh stuff and use something you trust around food and pets. Stick around—I’ll show you exactly how to tackle the job, hints to speed things up, and a few surprisingly handy tricks I wish I’d learned sooner.
- Why Bother With Homemade Oven Cleaners?
- Baking Soda and Vinegar: The Dynamic Duo
- How to Use the Homemade Cleaner Safely
- Troubleshooting Tough Grime
- Handy Tips Most People Miss
- Common Mistakes to Avoid
Why Bother With Homemade Oven Cleaners?
The truth is, most store-bought oven sprays stink—literally and in every other way. They’re loaded with chemicals like sodium hydroxide, which can irritate your lungs, eyes, and skin. If you live with pets or kids (my dog Charlie always seems to be sniffing around when I clean), that stuff can be a nightmare. There’s always a worry: what if you miss a spot and your oven smokes up the next time it heats?
When you use a homemade oven cleaner, you ditch the scary labels and save cash. Most people already have baking soda and vinegar in their kitchen, so there’s no need to shell out for a fancy spray. Plus, you’re not guessing what’s in it—it’s simple, safe, and it works.
Check this out—some basic numbers comparing common approaches:
| Method | Main Ingredients | Avg. Cost per Clean | Fumes/Smell | Skin Irritation Risk |
|---|---|---|---|---|
| Homemade: Baking Soda + Vinegar | Baking soda, vinegar, water | $0.50 | Low (vinegary) | Very low |
| Store-bought Chemical Spray | Sodium hydroxide, ethanol, fragrance | $3.00 | High (chemical) | High |
Homemade options aren’t just about saving money—they’re gentler on the environment. Store-bought sprays almost always come in single-use plastic bottles. When you mix your own, you only need a bowl and a cloth—no extra waste.
If you’ve ever tried scrubbing your oven the old-fashioned way, you know it’s no fun. Store cleaners can actually bake smells into your next pizza or roast, which is the last thing anyone wants. Homemade cleaners rinse off easy and don’t leave weird aftertastes. That’s peace of mind you can actually taste.
Baking Soda and Vinegar: The Dynamic Duo
This combo isn’t just a science fair volcano—it’s hands-down the best homemade oven cleaner you’ll find. Why do these two work so well? Baking soda is a gentle abrasive that scrubs away grime without digging into the surface, while vinegar helps dissolve grease and breaks down mineral deposits. When you mix them, the fizzing action helps lift stuck-on junk right off your oven walls.
Here’s a step-by-step way to put baking soda and vinegar to work in your kitchen:
- Mix half a cup of baking soda with a few tablespoons of water. You’re aiming for a paste, not a runny mess.
- Spread the paste all around the inside of your oven, especially on the worst spots. Avoid the heating elements—just move the racks out and slather it on thick where it counts.
- Let it sit overnight, or at least 10–12 hours. This gives the paste enough time to break down all that baked-on gunk.
- The next day, fill a spray bottle with plain white vinegar. Spritz the areas you covered with paste. The fizzing means it’s working!
- Wipe everything down with a damp cloth or sponge. For stubborn spots, use a plastic spatula or scrubber. Rinse and repeat if needed.
Baking soda isn’t toxic and won’t make your oven stink like chemical cleaners. Vinegar is great for dissolving grease and also helps get rid of any funky smells at the same time. If you want your oven looking clean and smelling like nothing at all, this is the tried-and-true trick that’s tough to beat.
Bonus tip: If you’re short on vinegar, lemon juice works in a pinch—it smells fresher, too.
How to Use the Homemade Cleaner Safely
Look, you want a sparkling oven, not a kitchen disaster. Using a homemade oven cleaner is safe—if you follow a few basic rules. Baking soda and vinegar aren’t toxic, but it’s smart to play it safe, especially with pets or little kids running around. I’ve got some simple steps to help you get it right.
- Turn off and cool down the oven. Never clean a hot oven, unless burning your hands is on your to-do list. Wait until it’s completely cool inside.
- Remove all racks and loose bits. Take out your racks, pizza stones, and any burnt crumbs. The cleaner works better this way, and you won’t get paste all over your cookware.
- Wear gloves. Even though baking soda isn’t harsh, the grime can be. A basic pair of rubber gloves saves your nails from gunk and makes scrubbing less gross.
- Apply cleaner and avoid heating elements. When smearing your baking soda paste around, stay clear of the heating elements—they don’t like getting wet. Same deal with the fan if you’ve got a convection oven.
- Stay ventilated. Even though there are no harsh fumes, a bit of airflow never hurts, especially once you add vinegar and things start fizzing up. A cracked window or kitchen fan is more than enough.
Once you’ve applied the paste and waited the recommended time (overnight is best for tough messes), don’t rush the final wipe. Use a damp cloth or a non-metallic scrubber so you don’t scratch the inside of your oven. For extra stubborn spots, do a second vinegar spritz and a little extra elbow grease—it usually does the trick.
And here’s something people miss often: don’t soak the oven door seals. Too much moisture can wear them out and mess with how your oven shuts. Also, ditch sponges with metal or wire—they’ll ruin that smooth oven finish for good.
Troubleshooting Tough Grime
Every oven has that one spot where gunk just laughs at regular scrubbing. If your baking soda paste didn’t cut it on the first go, don’t stress—it happens to everyone. Some messes are unionized.
The trick is patience and upping your game. For truly stubborn spots, sprinkle a little more baking soda right on the greasy blob, then add a splash of vinegar. The fizzing isn’t just fun—it actually helps break down carbon and food bits stuck for ages. Wait at least 10 minutes.
If you’re dealing with years-old mess (think: dark patches or crusty corners), grab a soft scouring pad or even a plastic spatula. Metal tools might scratch the enamel, so skip those. After the fizzing stops, scrub in a gentle circle. For oven racks, toss them in your bathtub with hot water and a quarter cup of dish soap for a few hours—way easier than wrestling with them in the kitchen sink.
- If you still see blackened bits, make a second paste—this time, use more baking soda and a few drops of dish soap. Slather it on and let it sit overnight if you can.
- The next day, wipe with a damp cloth (microfiber works best). Don’t worry if you need to repeat this—some grime laughs at anything shy of a flamethrower.
- If chemical-free isn’t strict and you’re desperate, a squirt of regular hydrogen peroxide with baking soda will zap leftover stains. Just rinse everything well afterwards.
Want to see how different methods stack up for tough grease? Here’s a quick breakdown:
| Method | Time Needed | Effectiveness | Best For |
|---|---|---|---|
| Baking Soda + Vinegar | 8-12 hrs (overnight) | 85% | General burnt-on mess |
| Baking Soda + Dish Soap | 6-8 hrs | 75% | Greasy gunk |
| Hydrogen Peroxide + Baking Soda | 2-4 hrs | 90% | Stubborn stains |
| Oven Rack Soak (dish soap) | 4-5 hrs | 80% | Removable racks |
Bottom line: tackling tough oven mess takes time but not much money. Using a homemade oven cleaner, a little patience, and the right tool for the job, you’ll beat that grime. Don’t forget to keep your kitchen well-ventilated too—though these solutions are safe, nasty odors can still pop up if you’re digging out ancient leftovers.
Handy Tips Most People Miss
Most people just slap some baking soda on the oven walls and call it day, but a few extra moves make a big difference. First up, always take out the racks before cleaning. Soak them in hot, soapy water—add a bit of dishwasher tablet if you have one. Let them sit while you tackle the inside. They’ll come out cleaner and you won’t bang your elbows trying to scrub around them.
Got stubborn gunk? Use an old plastic gift card or spatula to scrape it off gently—don’t grab metal tools or you’ll scratch the surface. If grime just won’t budge, hit that area with a paste of baking soda and a drop of dish soap. Let it sit for 10–15 minutes before wiping. That combo works especially well on the window, where fat often bakes on thick.
Wiping things down is easier if you use a damp microfiber cloth instead of paper towels. Microfiber grabs the baking soda residue better, so you don’t wind up with a gritty mess left behind. If your oven still smells funky after cleaning, pop in a small dish of water with lemon slices and heat it for 20 minutes at 250°F. You’ll wipe out the last of the smells and any loosened bits.
- Remember to wear gloves—baking soda can dry out your skin quickly.
- Stick a sheet of aluminum foil under your next casserole to catch drips and prevent future work.
- Clean your oven door seals gently. Rubbing too hard can mess up the seal and let heat escape.
Just so you get a quick idea why ditching store-bought stuff makes sense, check this out:
| Cleaner Type | Avg. Cost per Use | Contains Harsh Chemicals? | Safe for Kids/Pets? |
|---|---|---|---|
| Homemade oven cleaner | $0.60 | No | Yes |
| Popular spray brand | $2.50 | Yes | No |
A laptop timer or your phone makes it way easier to keep track of how long your paste is sitting. Set it and forget it for the night—no more running back and forth to check. Oh, and always keep your pets out of the kitchen while you clean. My dog Charlie once tried to ‘help’ and got a snout full of baking soda dust, which wasn’t fun for either of us.
Common Mistakes to Avoid
Even when you’re using the homemade oven cleaner, it’s easy to mess up and make the job way harder than it has to be. Here are some things folks commonly get wrong:
- Scrubbing too hard (or too soon): Baking soda needs time to break down burnt-on grease. If you start scrubbing just after spreading it on, you’re wasting effort and might scratch the oven surface. Give it at least 8-12 hours, or overnight.
- Forgetting to rinse thoroughly: Baking soda can leave a white film behind if you don’t wipe it off completely with a damp cloth. Don’t just swipe once—rinse your rag and go over the surface a few times.
- Ignoring safety with electrical parts: Never slather cleaning paste right on heating elements or wires. Getting moisture in the wrong spot can mess up your oven or even spark a short circuit.
- Using the wrong tools: Don’t grab steel wool, metal scrapers, or very stiff brushes. These can scratch the glass and enamel, leaving you with permanent marks. A regular dish sponge or a soft brush is plenty.
- Missing hidden grease traps: Stuff collects in the cracks around the door, the hinges, and the corners. Use a toothbrush or an old paintbrush to get into these spots.
- Not opening windows: Even though it’s natural, the vinegar and baking soda fizz can create a pretty strong smell. Crack a window or run a fan to keep the air fresh, especially if pets or sensitive noses are nearby.
Here’s a look at common issues folks face and the simple fix for each:
| Mistake | What Happens | Quick Fix |
|---|---|---|
| Leaving cleaner residue | White powdery streaks after baking | Wipe multiple times with a damp cloth |
| Soaking heating elements | Possible oven malfunction or safety hazard | Avoid wetting elements; spot clean only |
| Scrubbing right away | Grease stays stuck, and you scratch the surface | Let cleaner sit overnight for best results |
| Using harsh tools | Permanent scratches on glass or enamel | Stick with sponges or soft brushes |
It’s all about patience and using the right stuff in the right places. Most ovens don’t need brute force or harsh chemicals—they just need you to work smart and give your homemade mixture time to do its thing.